How to Make a Character Reference Sheet with AI

A character reference sheet is a single document that shows one character the same way every time: a full-body turnaround from several angles, key expressions, the color palette and close-ups of details like clothing and props. Animators, game artists and brand teams use it to keep a character consistent. On getimg.ai, you can design the character with Character creator, turn it into front, side and back views with Every angle and add expressions in Create image, so the sheet takes an afternoon instead of a week of drawing.
What is a character reference sheet?
A character reference sheet (also called a ref sheet, model sheet or character sheet) is the visual rulebook for one character. It answers every question someone might have while drawing, animating, modeling or prompting that character: how tall they are, what the back of the jacket looks like, which side the bag hangs on, what exact orange the coat is, and how the face changes when they laugh.
The format started in animation studios, where dozens of artists had to draw the same character across thousands of drawings. The model sheet kept everyone on model. Today the same idea runs through game development, comics, children's books, brand mascots, VTubers and independent artists who share an "OC ref sheet" so commissioned artists can draw their original character correctly.
A ref sheet is not a portfolio piece. Its job is clarity. Plain background, even lighting, a neutral pose and nothing that hides the design.
What to include on a character reference sheet
Most professional sheets combine the same building blocks. Pick the ones your project needs; a mascot for social posts needs less than a lead character in a 3D game.
Section | What it shows | Who relies on it most |
Turnaround | The full body from the front, three-quarter, side and back, at the same scale | Animators, 3D modelers, AI prompting |
Expression sheet | The face in 4 to 8 emotions | Animators, comic artists, storyboarders |
Color palette | Flat swatches for skin, hair, eyes, clothing and props, ideally with hex codes | Colorists, designers, print teams |
Callouts | Close-ups of details: logos, buckles, tattoos, shoes, accessories | Everyone who has to draw the small stuff |
Pose sheet | A few action or signature poses | Animators, illustrators, marketing |
Size chart | Height next to other characters or a simple scale bar | Animation, games, comics with ensembles |
Notes | Short rules: personality, what never changes, what can vary | Writers, brand teams, freelancers |
If you only make one part, make the turnaround. It's the section that prevents the most mistakes, because the back and side of a character are exactly what people guess wrong.
Character turnaround: the core of the sheet
A character turnaround shows the same character rotating in place. The classic layout uses four or five views in a row:
- Front
- Three-quarter front
- Side (profile)
- Three-quarter back
- Back
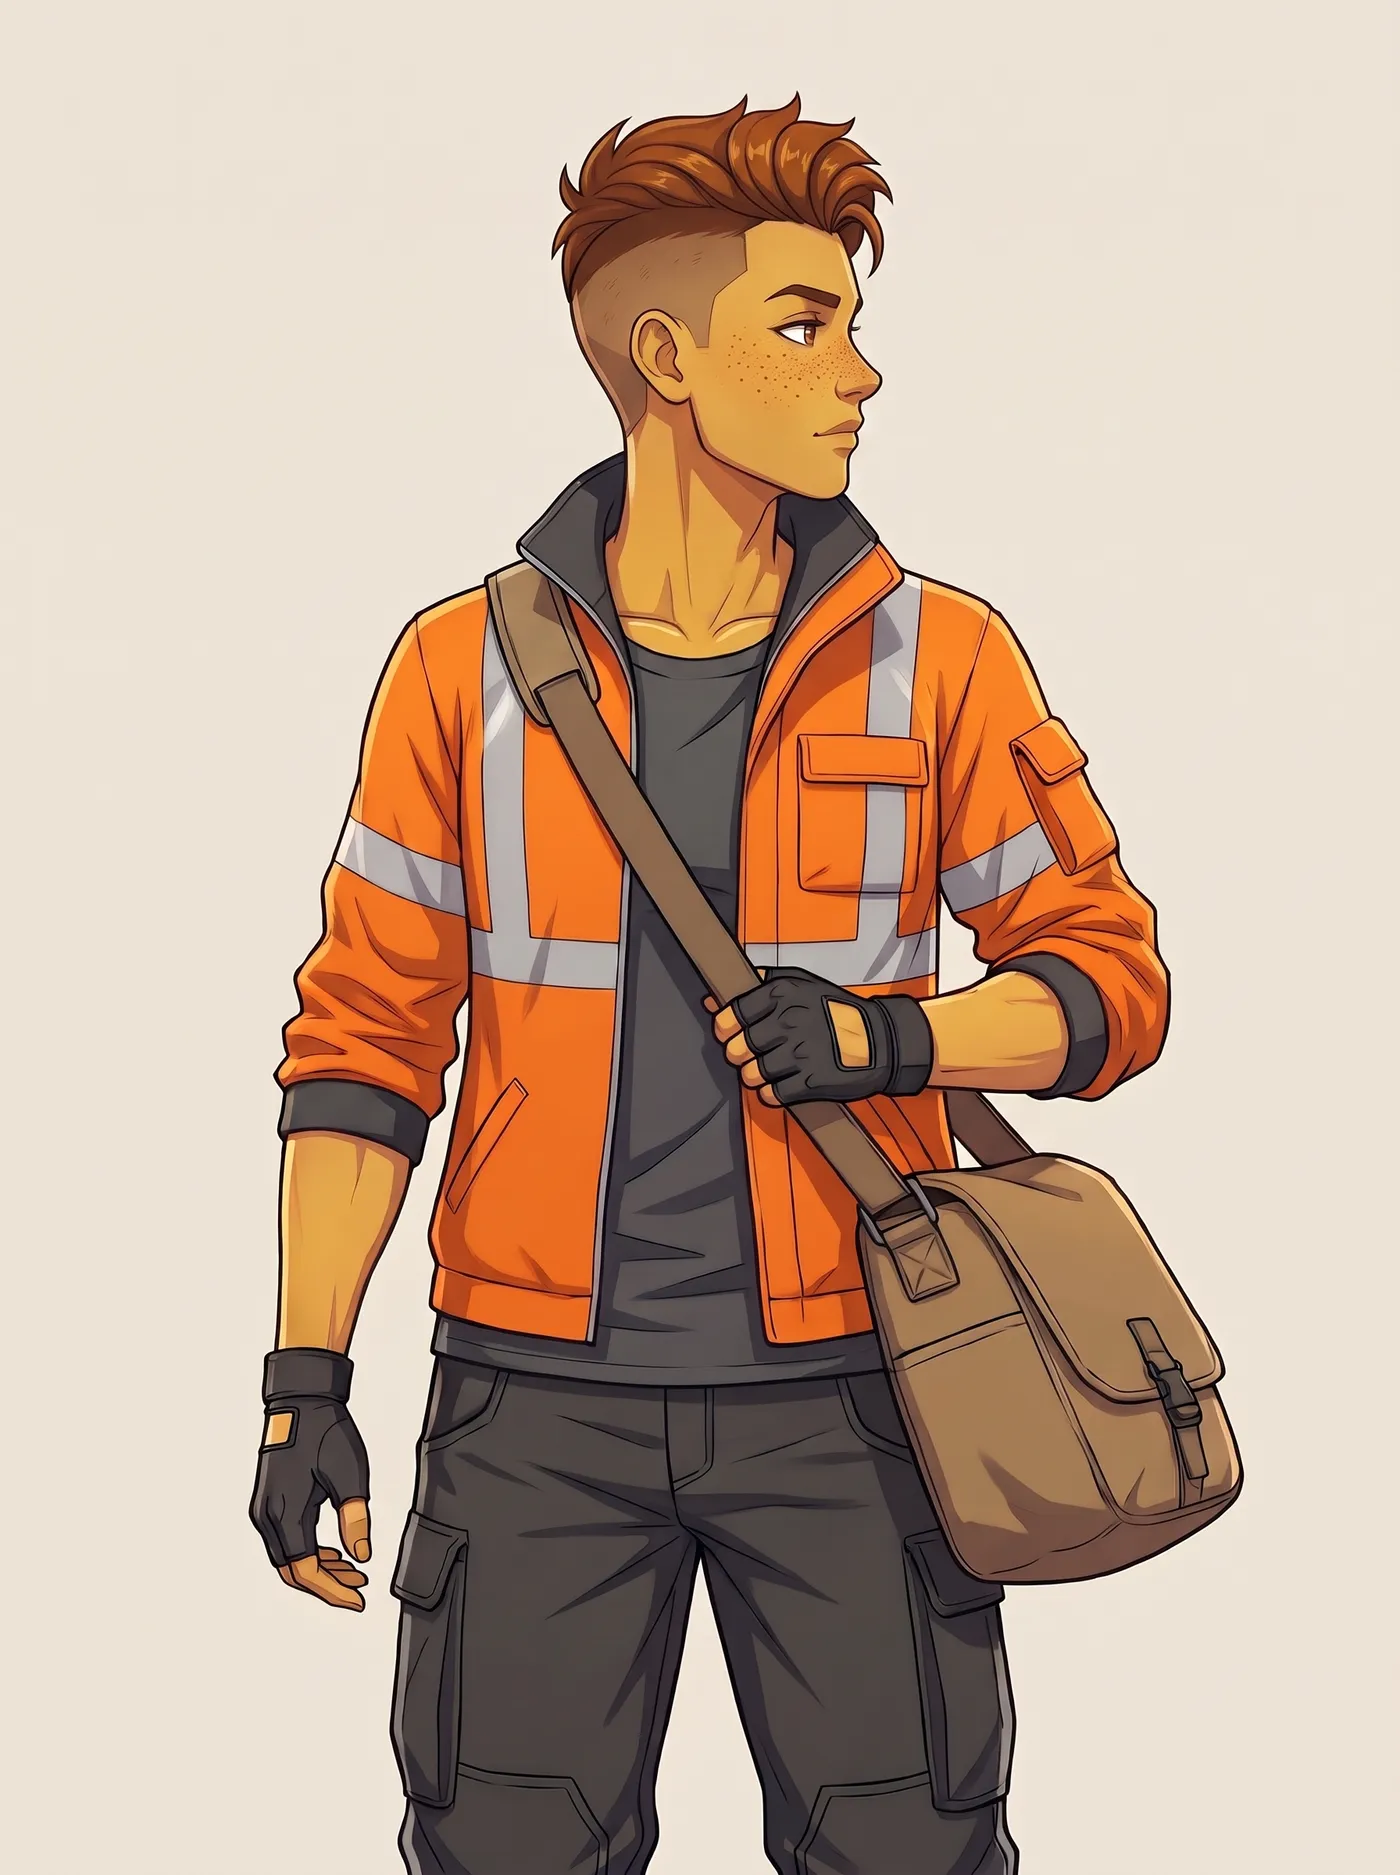
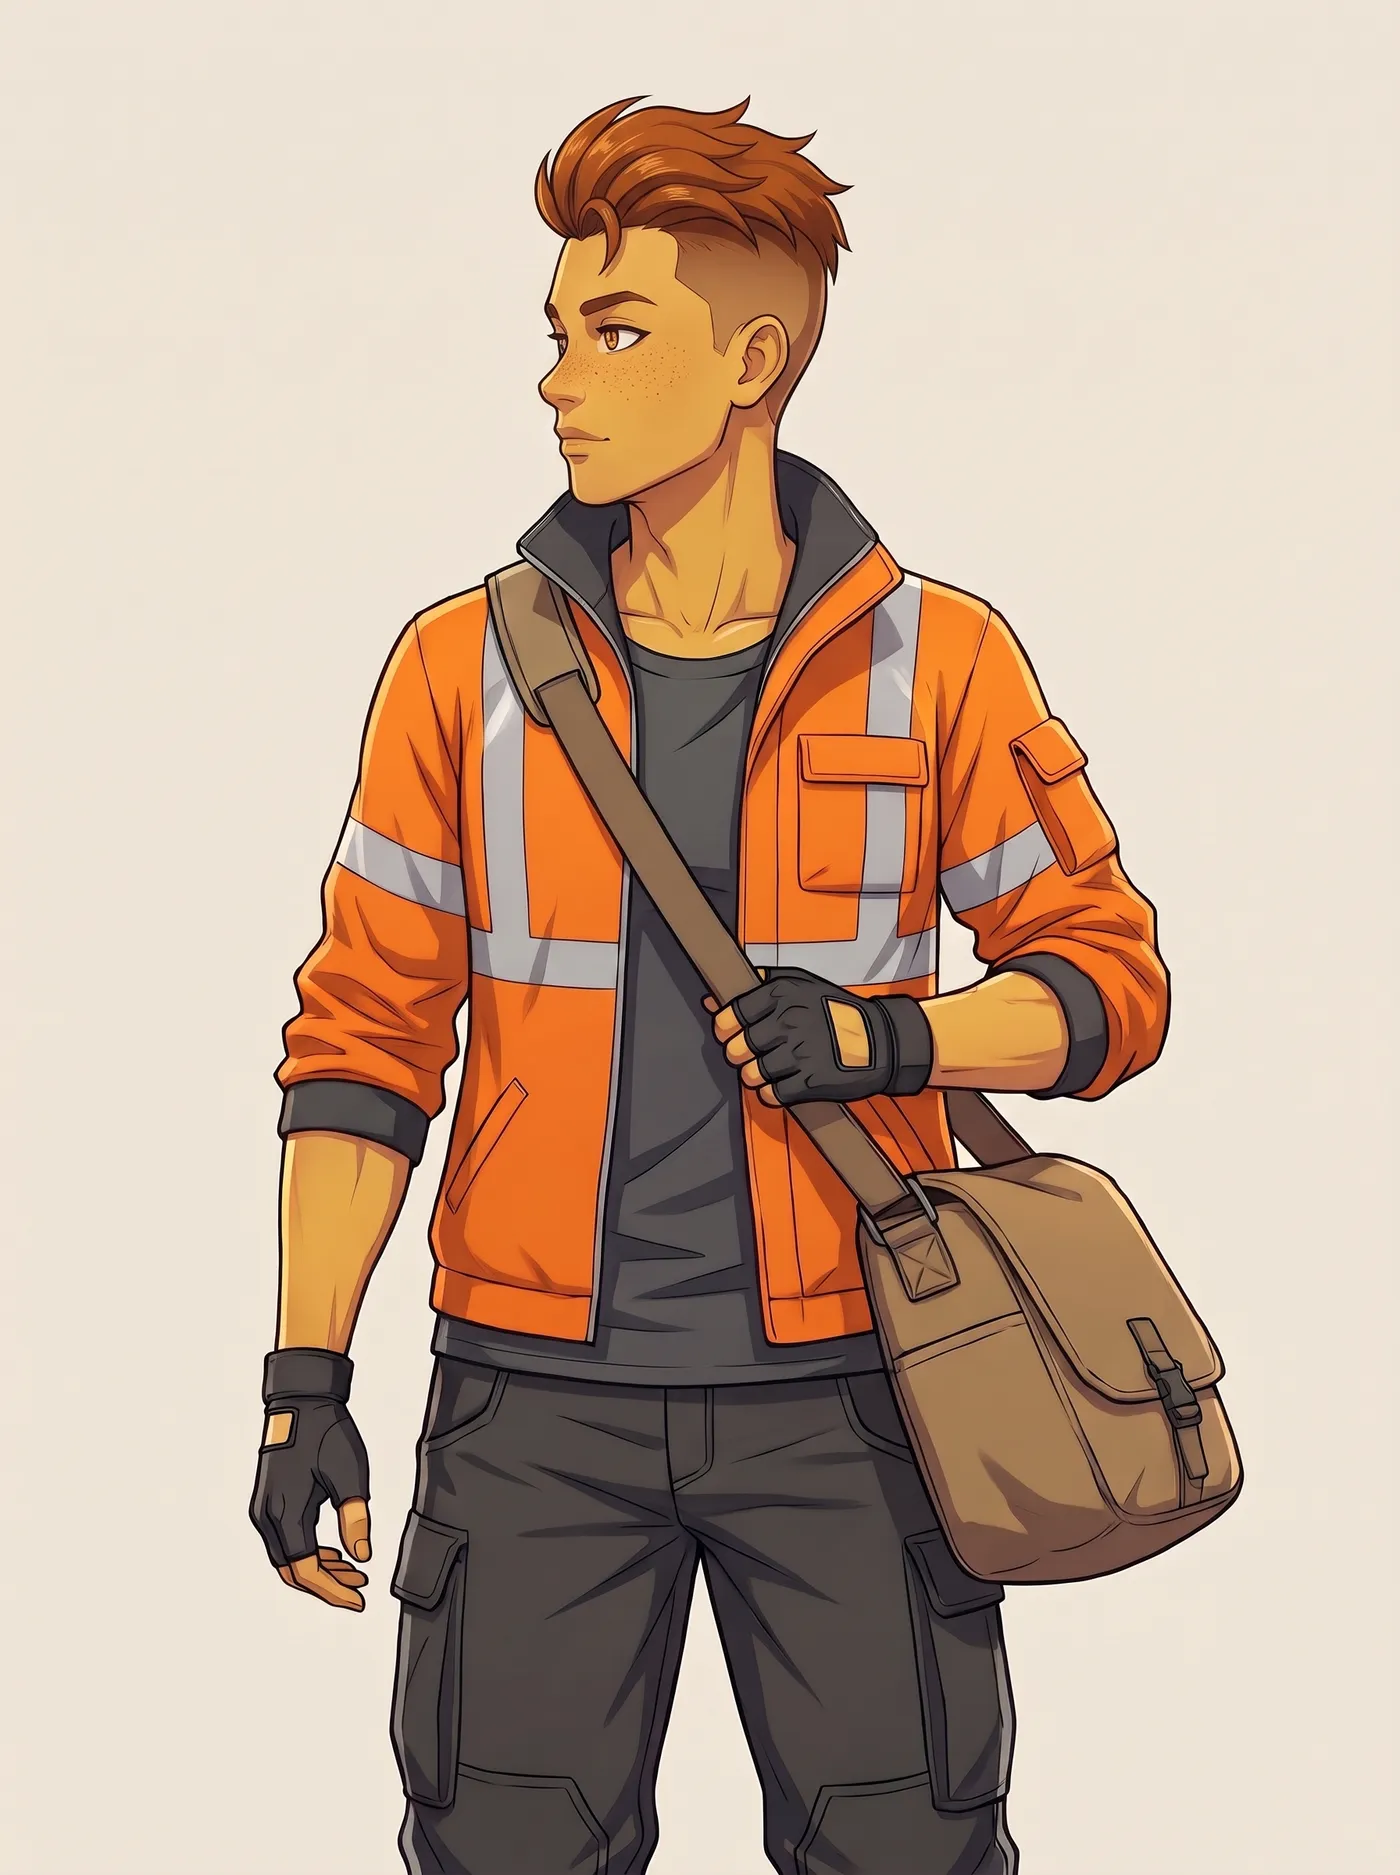
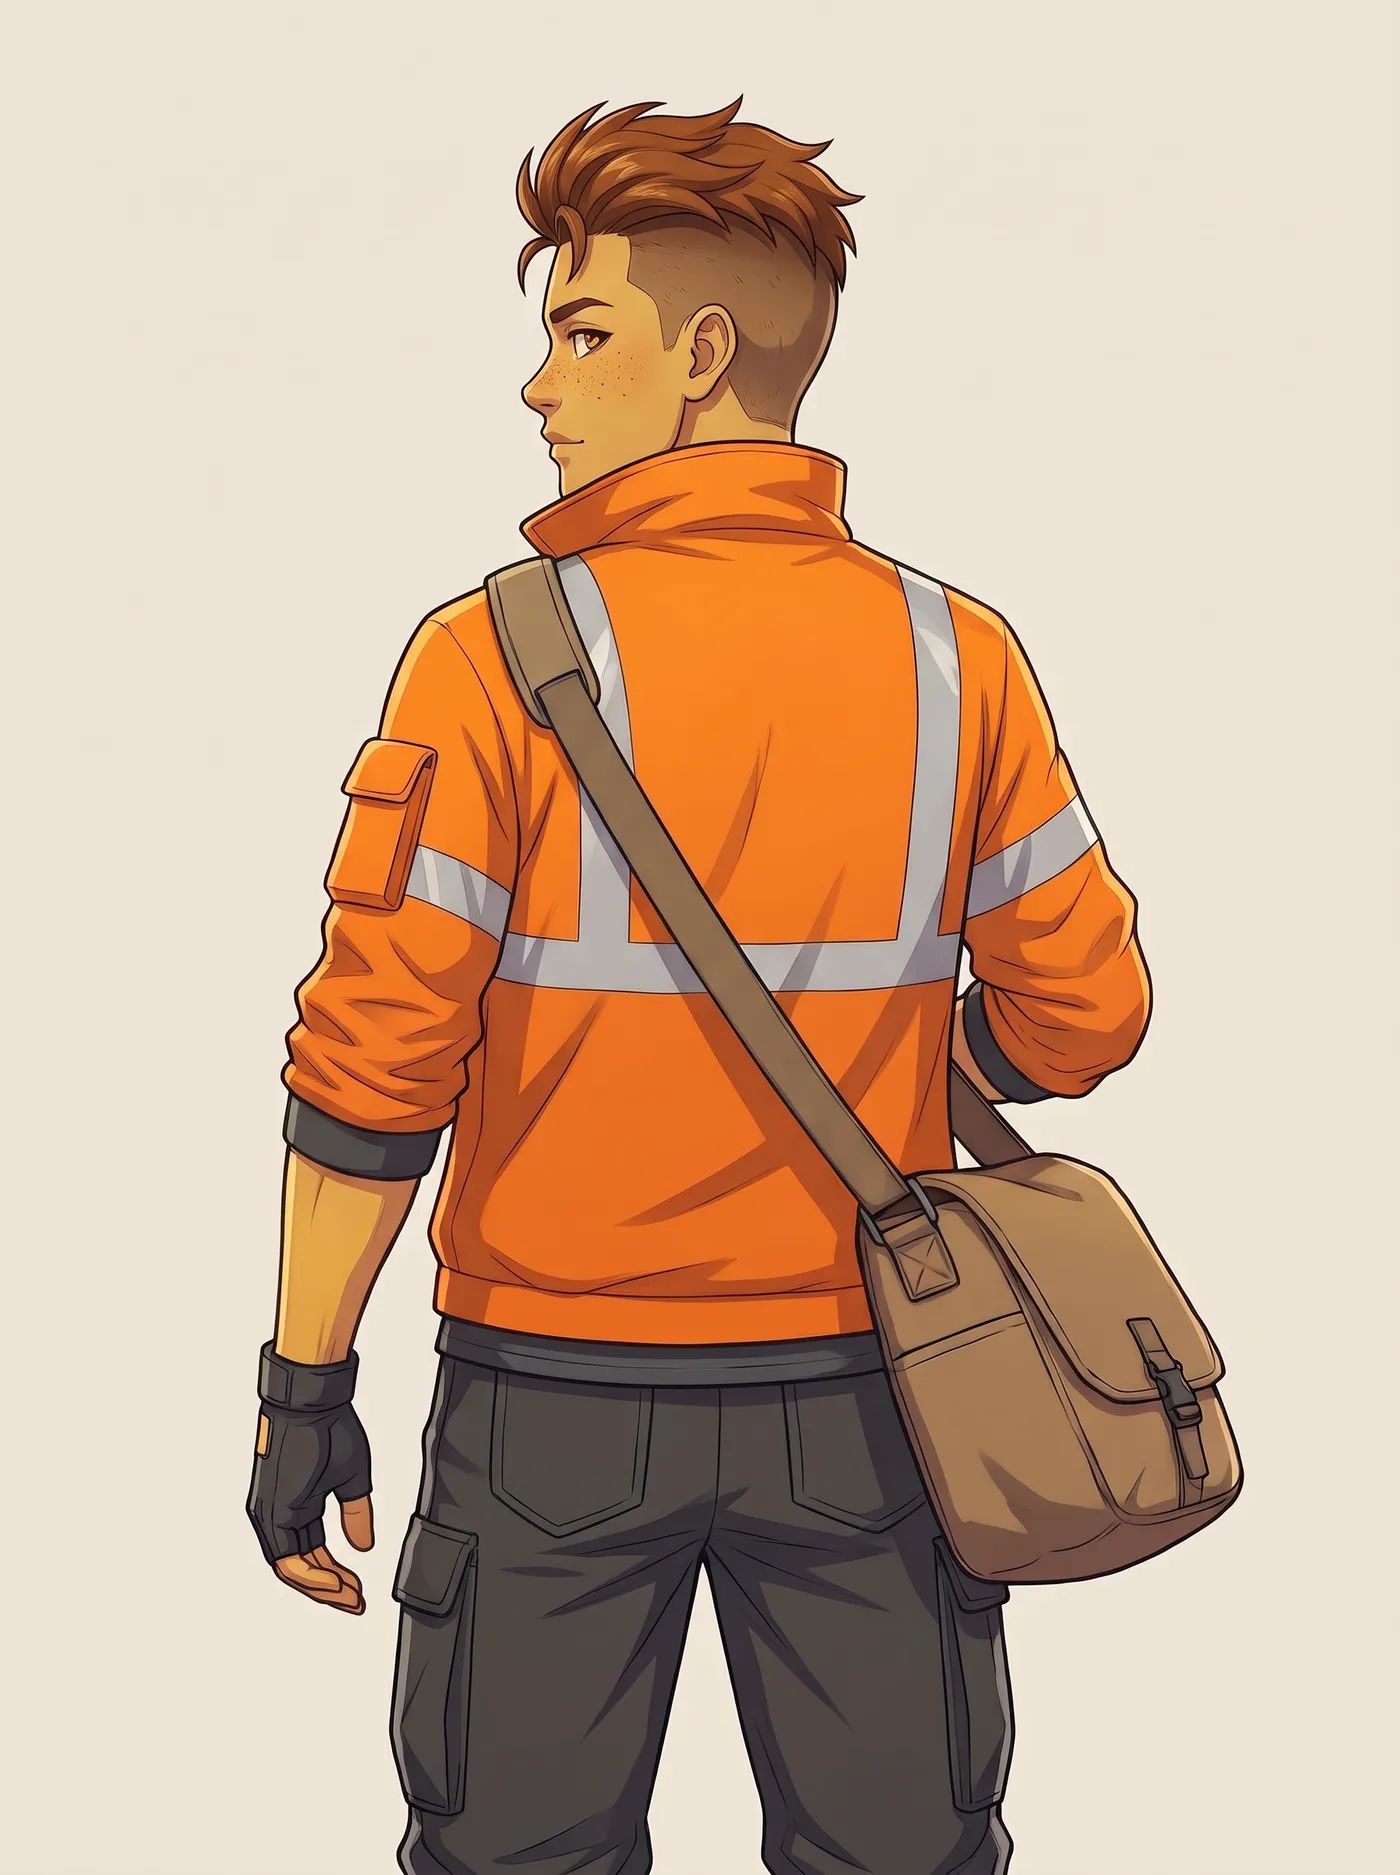
Every view keeps the same pose, the same scale and the same horizon line, so you can trace a line across the heads, shoulders, belts and feet and it hits the same point on each figure. That alignment is what makes a turnaround useful for modeling and animation, and it's the first thing to check when you build one.
Eight-view turnarounds add the in-between angles for 3D work. Two-view sheets (front and back) are common for simple mascots and merch.
How to make a character reference sheet with AI
Here's the workflow we used for the example in this guide: an original bike courier character, built from scratch and turned into a set of reference views on getimg.ai.
1. Design the character
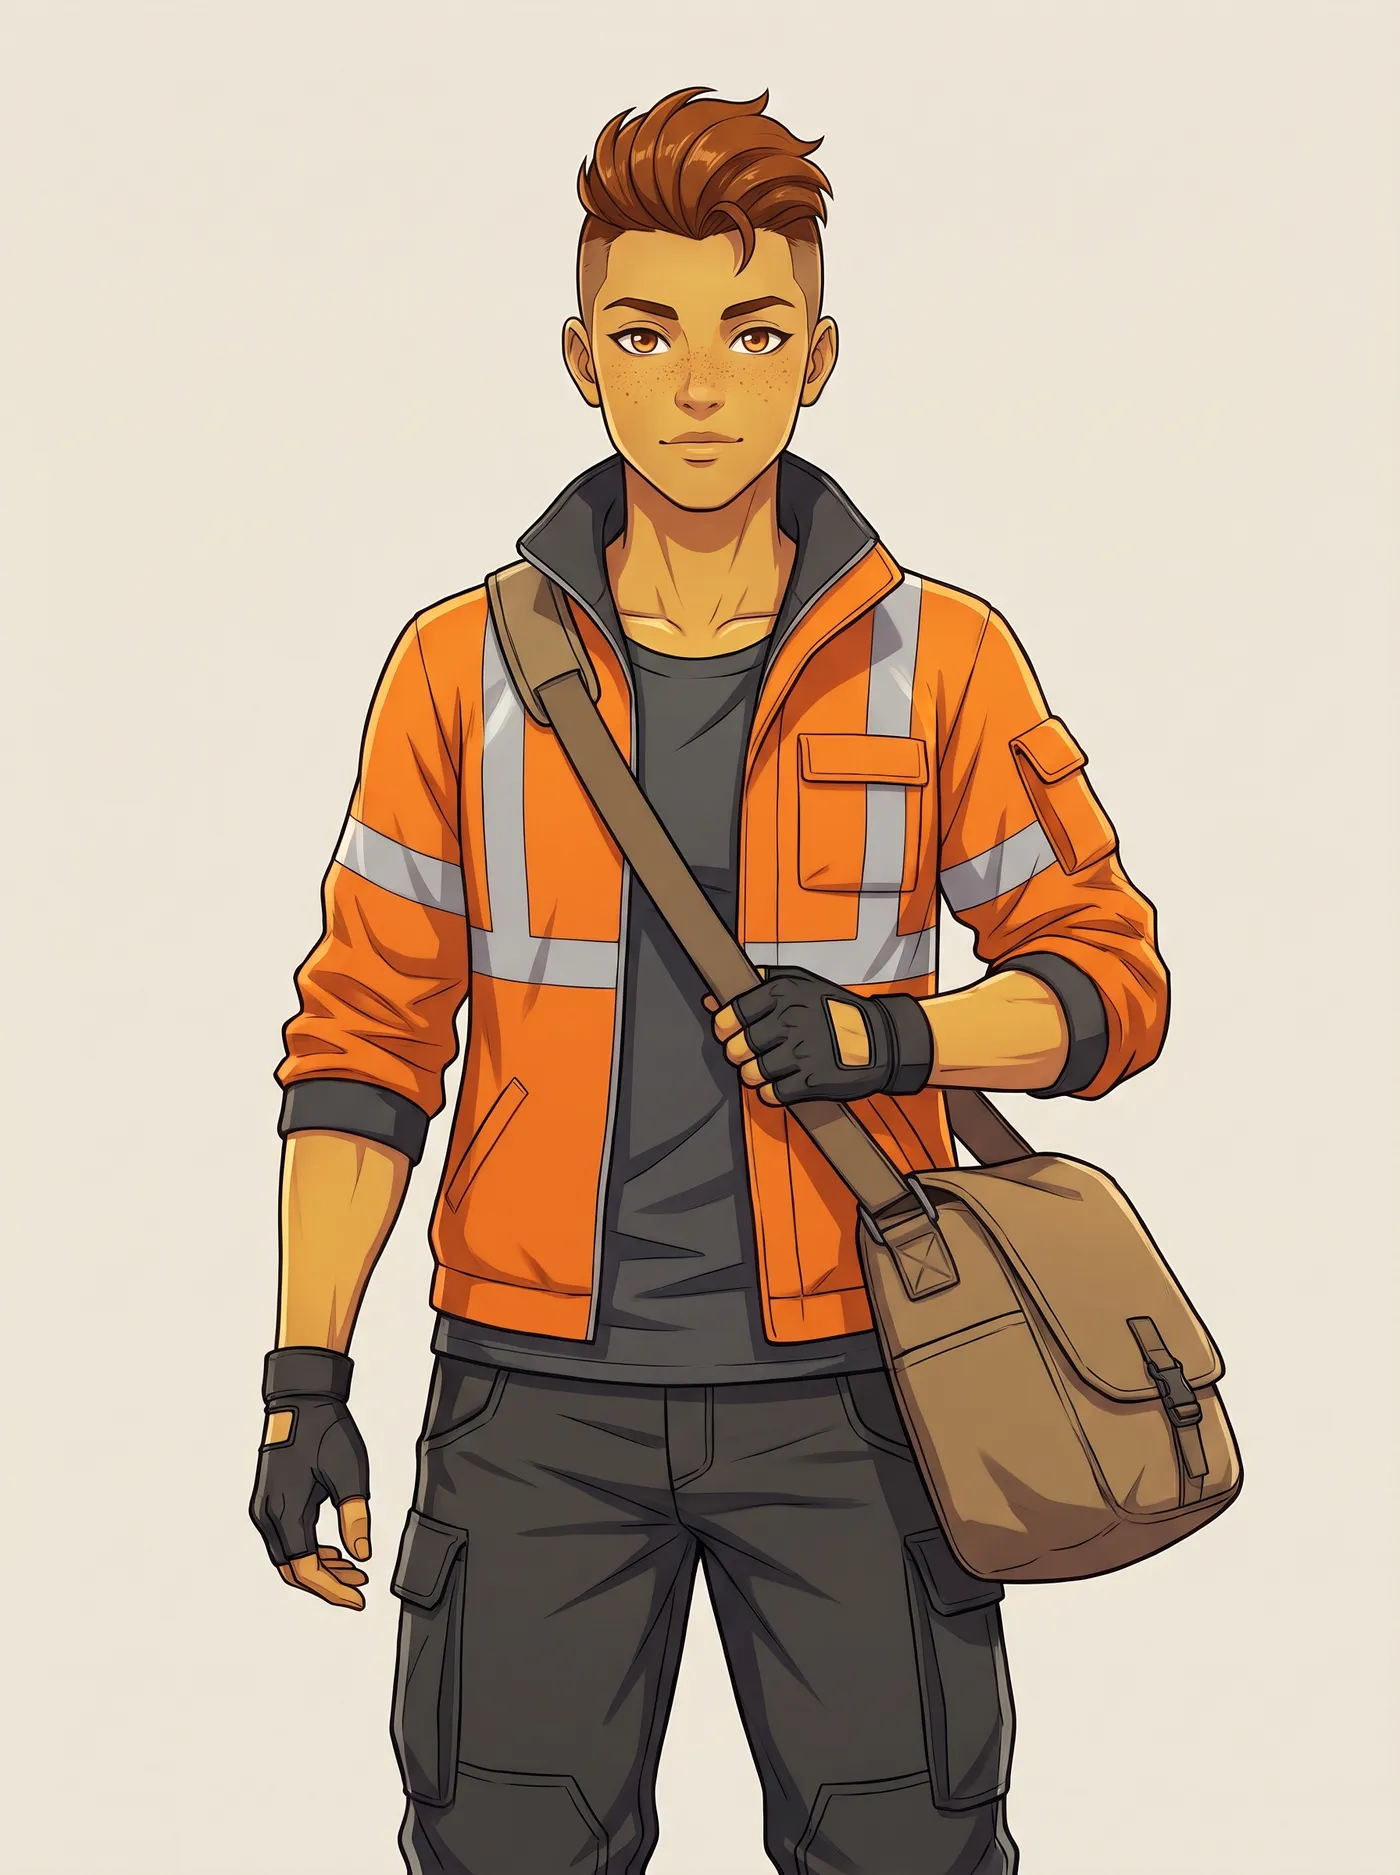
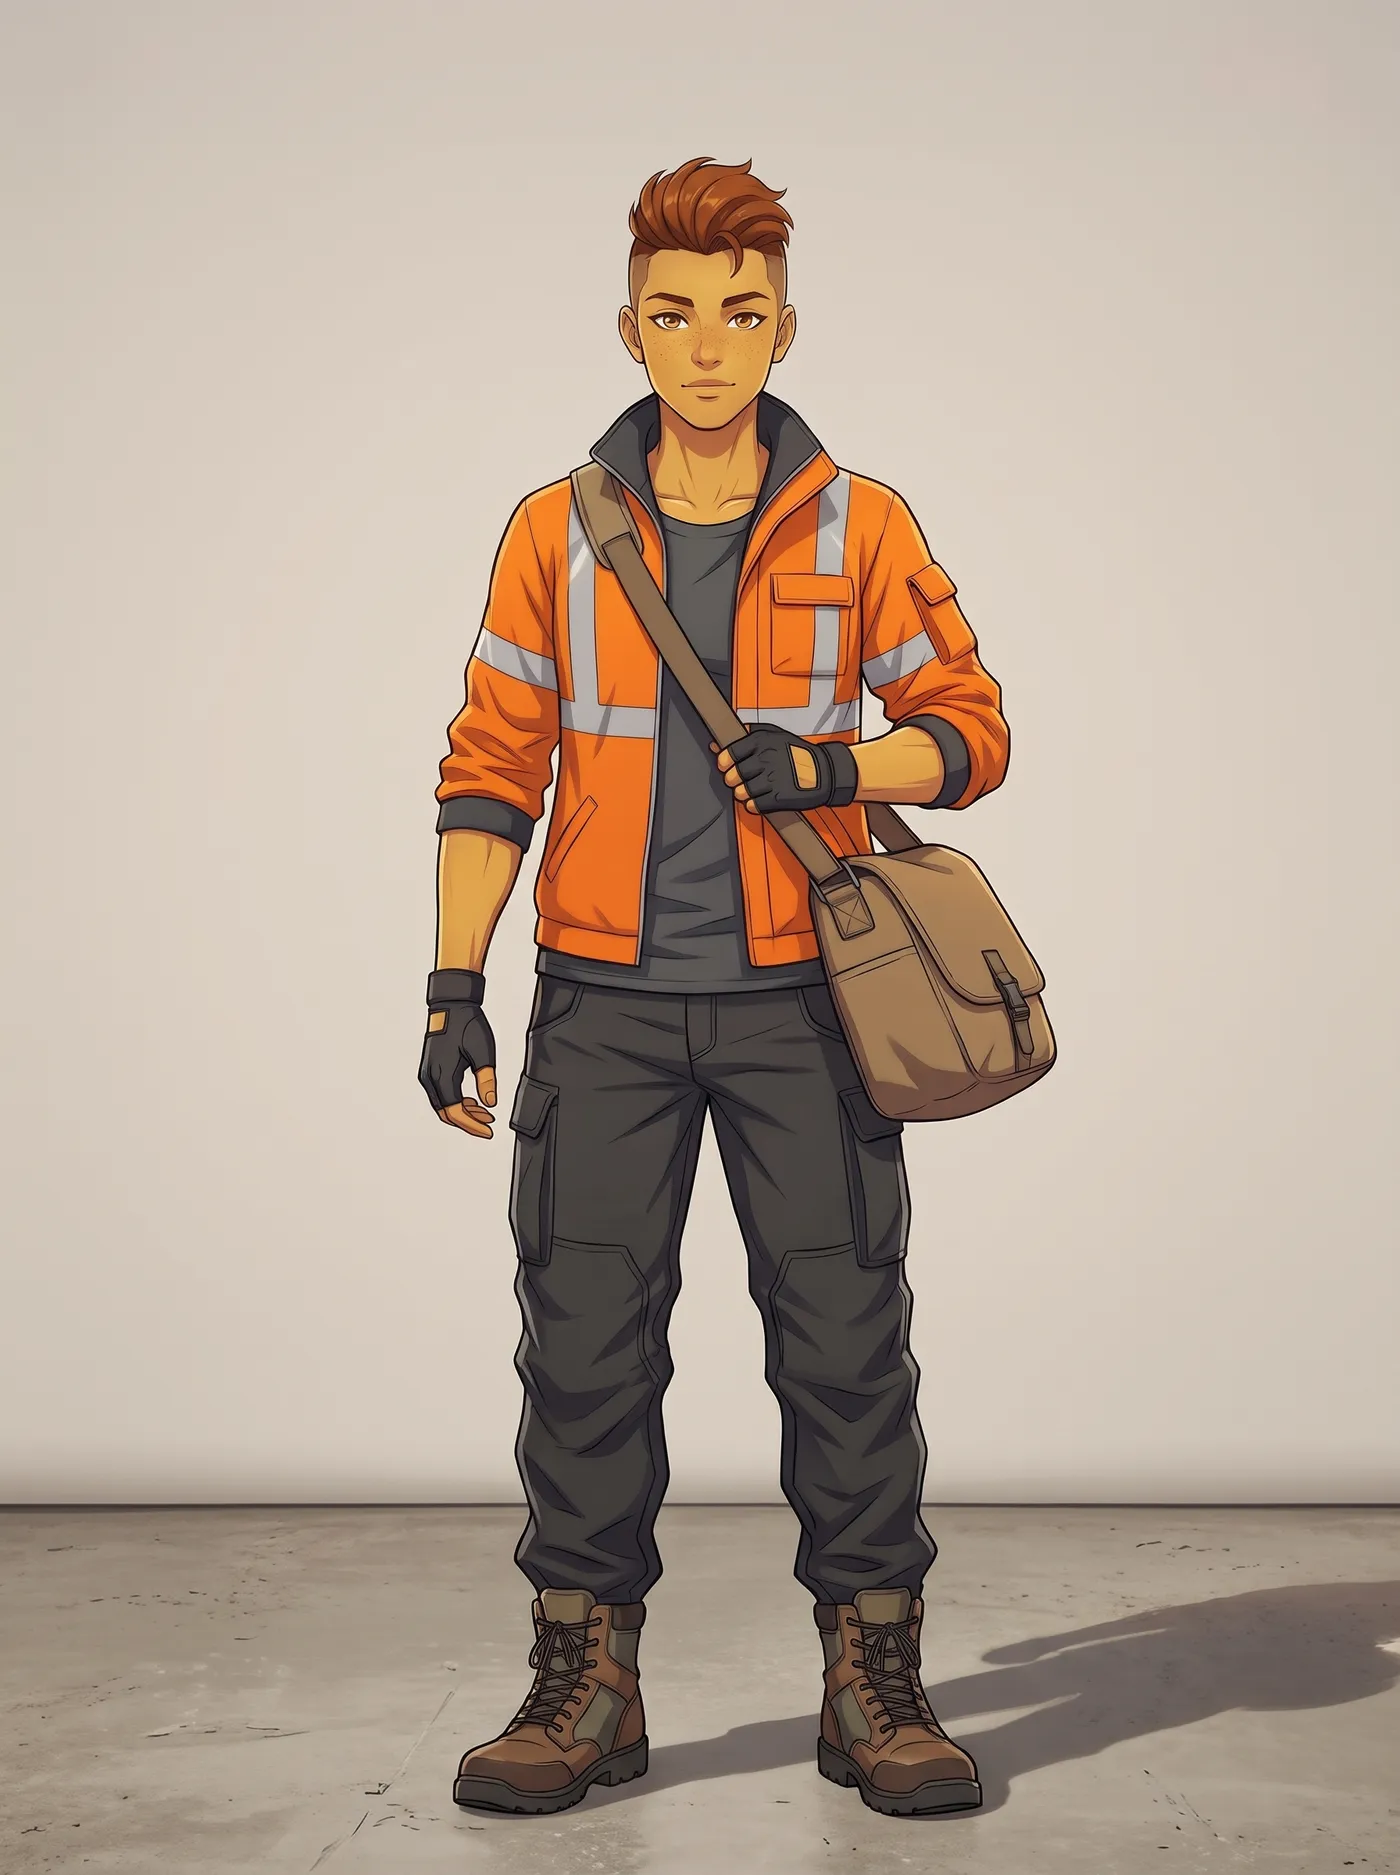
Start with one clean, full-body image of the character on a plain background. If you already have a drawing or a 3D render, use that. If you're starting from nothing, the Character creator Action builds an original character from a list of traits instead of a prompt: gender, heritage, build, skin tone, skin details like freckles or scars, hair style and color, eyes, age, outfit and art style (photoreal, anime, 3D render, comic or painterly).
For the courier we picked anime style, an athletic build, golden skin with freckles, a chestnut undercut, amber eyes and workwear, then added "orange utility jacket with reflective stripes, messenger bag" in the extra details field. The guide on how to create an original character with AI covers every option in that list.
2. Generate the turnaround views
Next, add the character image to Every angle and choose how far around to go: 4, 8 or 12 angles. It returns the same character seen from different viewpoints, at the aspect ratio you pick. For a ref sheet, 3:4 keeps the full figure in view.
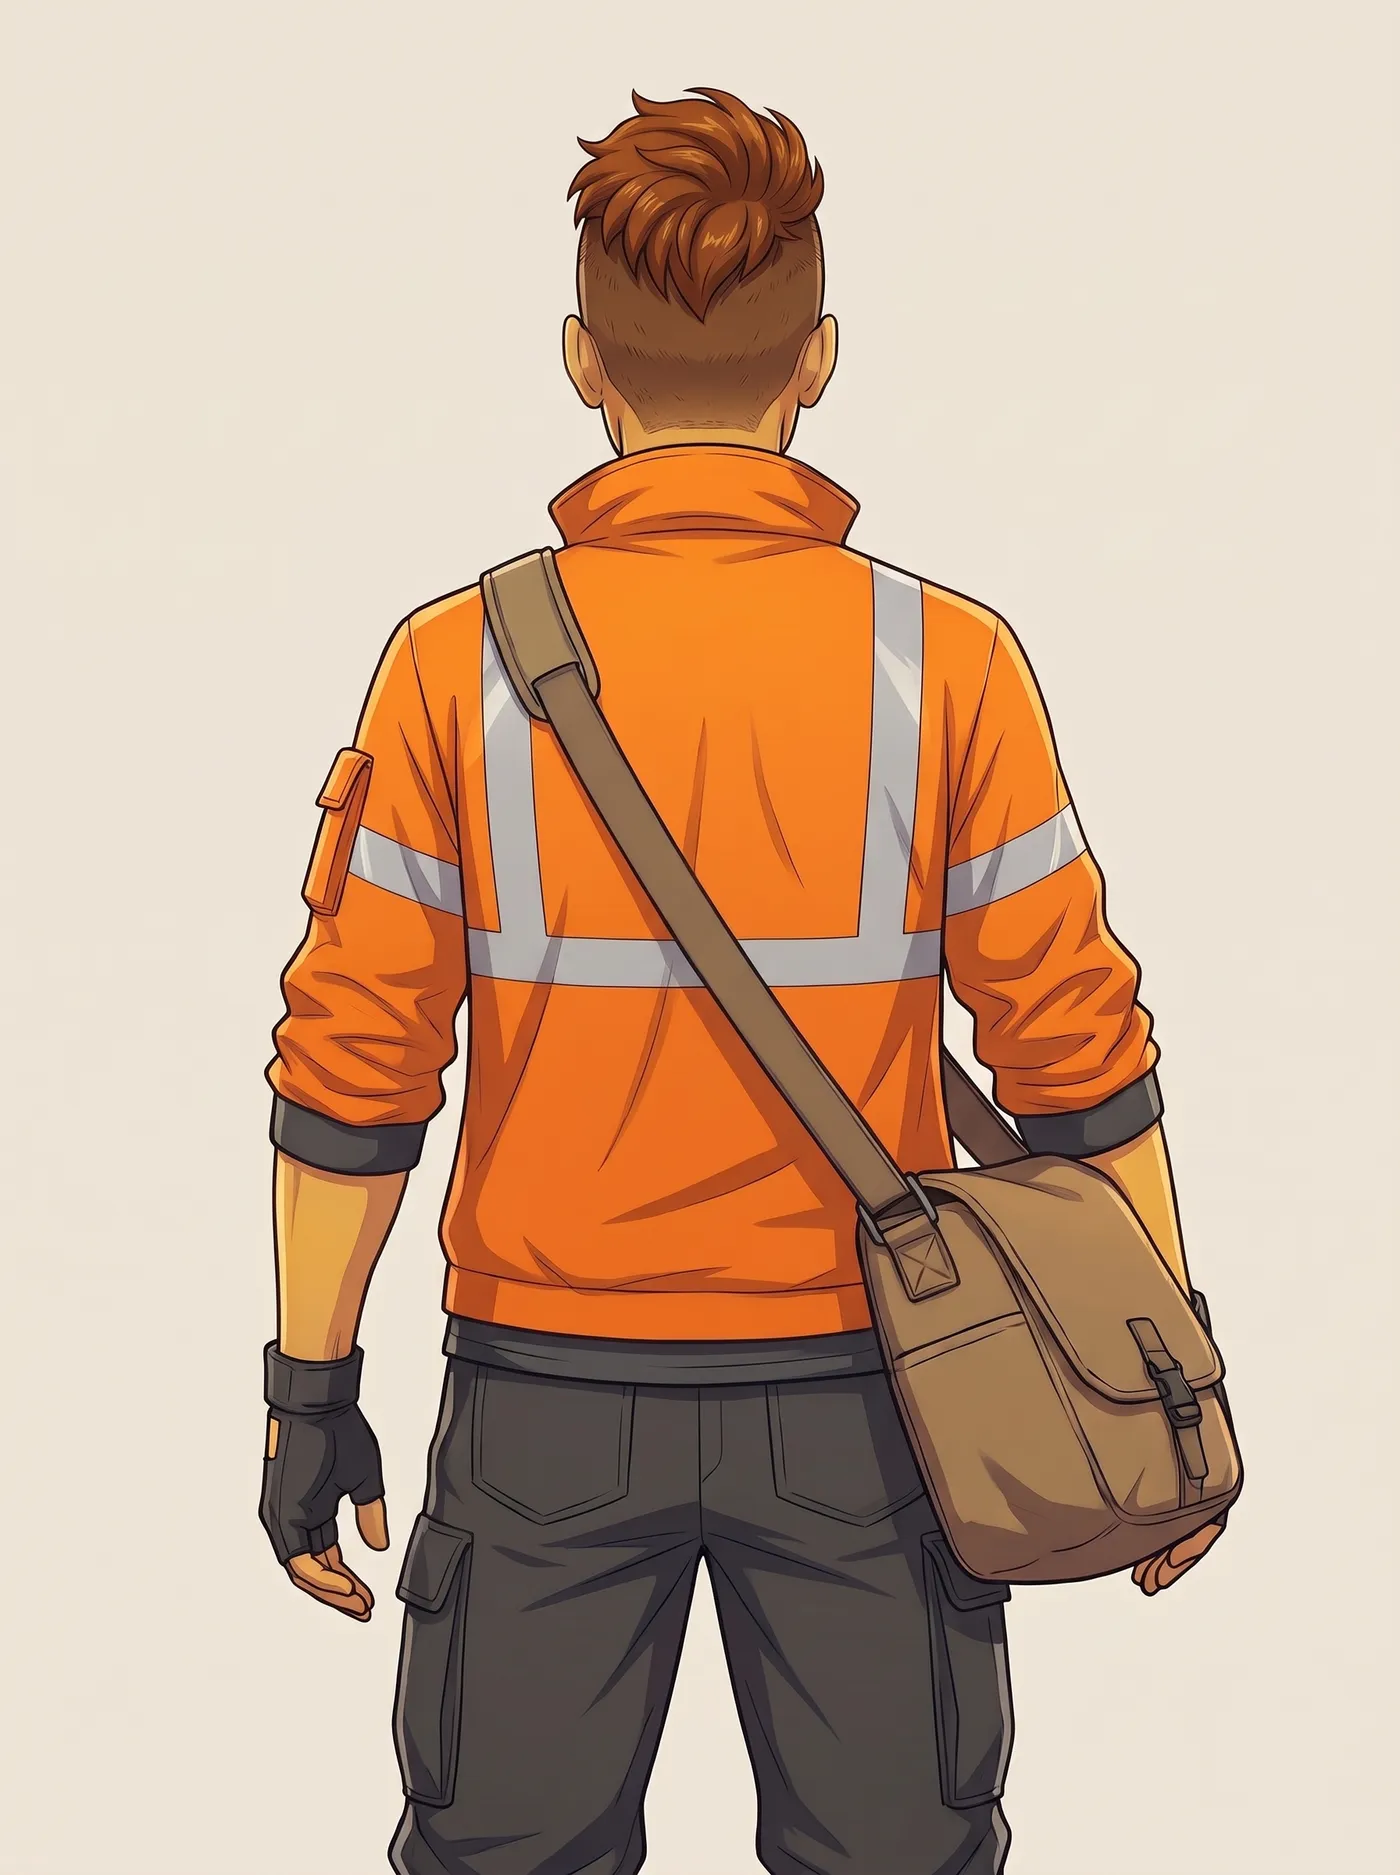
Not every angle in a set is equally useful. In our 8-angle run, the over-the-shoulder views came out cleanly, while some of the three-quarter views turned the head more than the body and the back view moved the bag to the wrong hip (step 5 shows the fix). Treat the set as raw material: keep the clearest front, side and back views, and rerun if a key angle is missing. The walkthrough on how to generate a subject from every angle explains the settings in more detail.
3. Add expressions and callouts
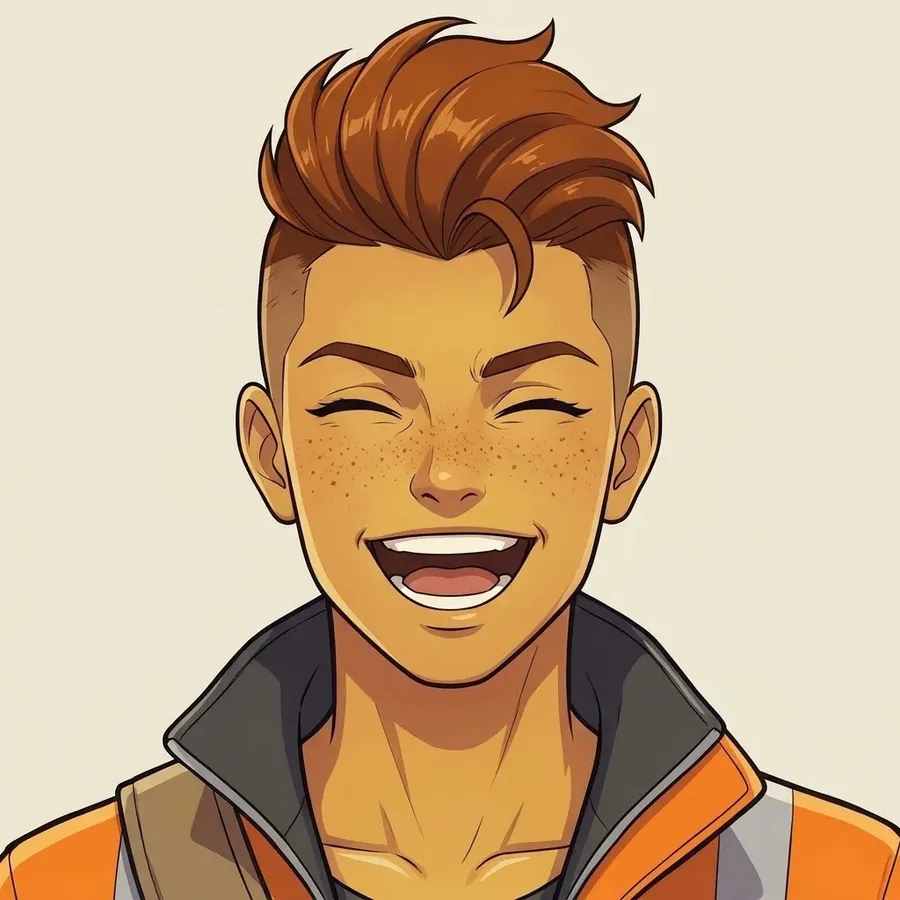
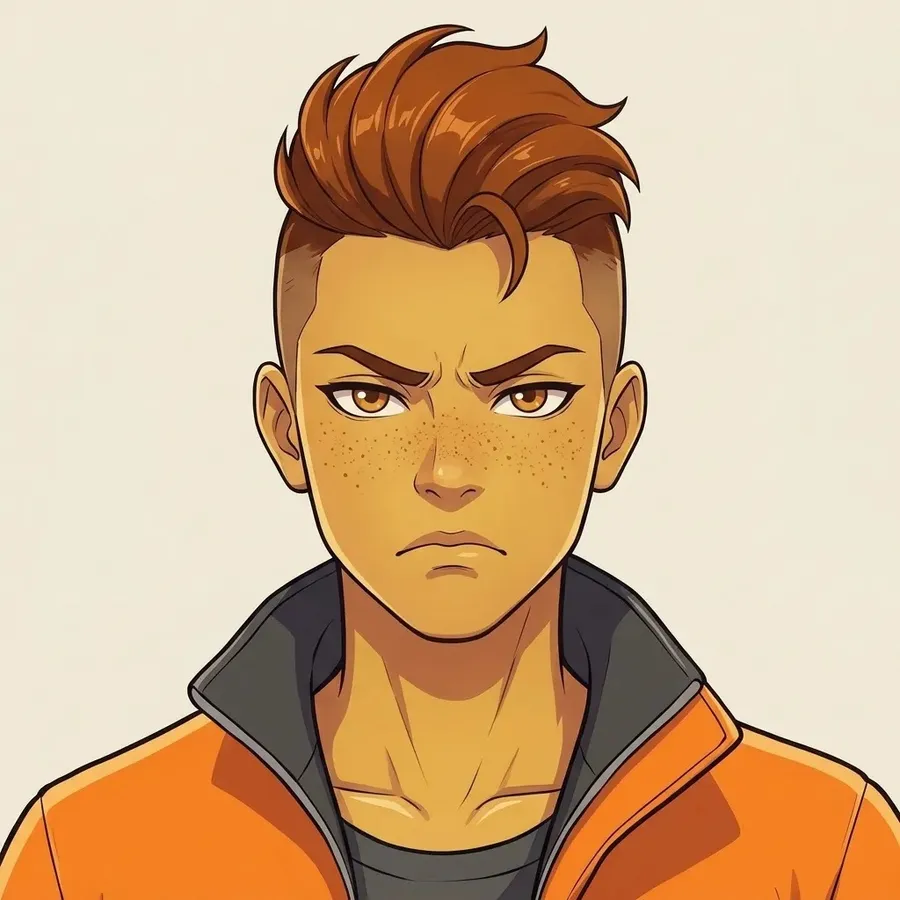
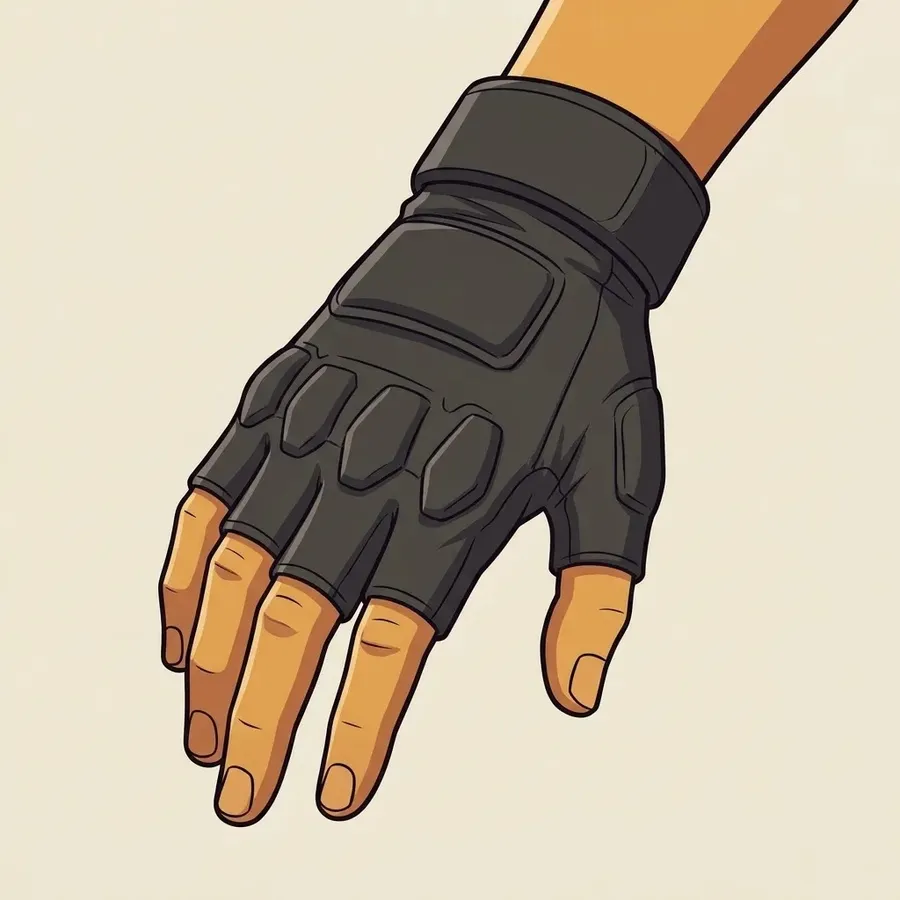
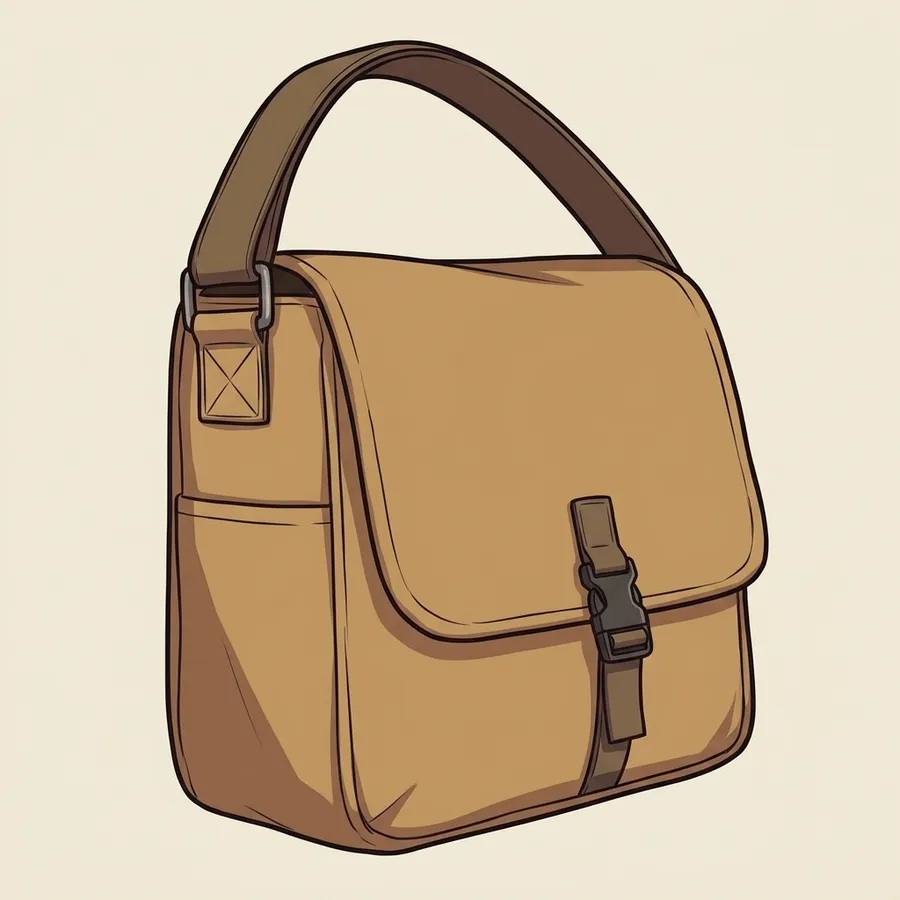
For expressions and close-ups, open Create image, add the character as a reference and describe what you need, for example "the same character, head and shoulders, laughing, plain cream background". Generate one emotion at a time rather than a whole grid in one go; single expressions come back cleaner and are easier to compare. Do the same for callouts: "close-up of the same fingerless glove", "the messenger bag buckle from the front".
4. Lay out the sheet
Put the pieces together in any layout tool: Figma, Photoshop, Procreate, Canva or a slide deck. A typical layout runs the turnaround across the top, expressions down one side and callouts plus the color palette along the bottom. Pick the palette swatches straight from the generated images with an eyedropper and write the hex codes next to them.
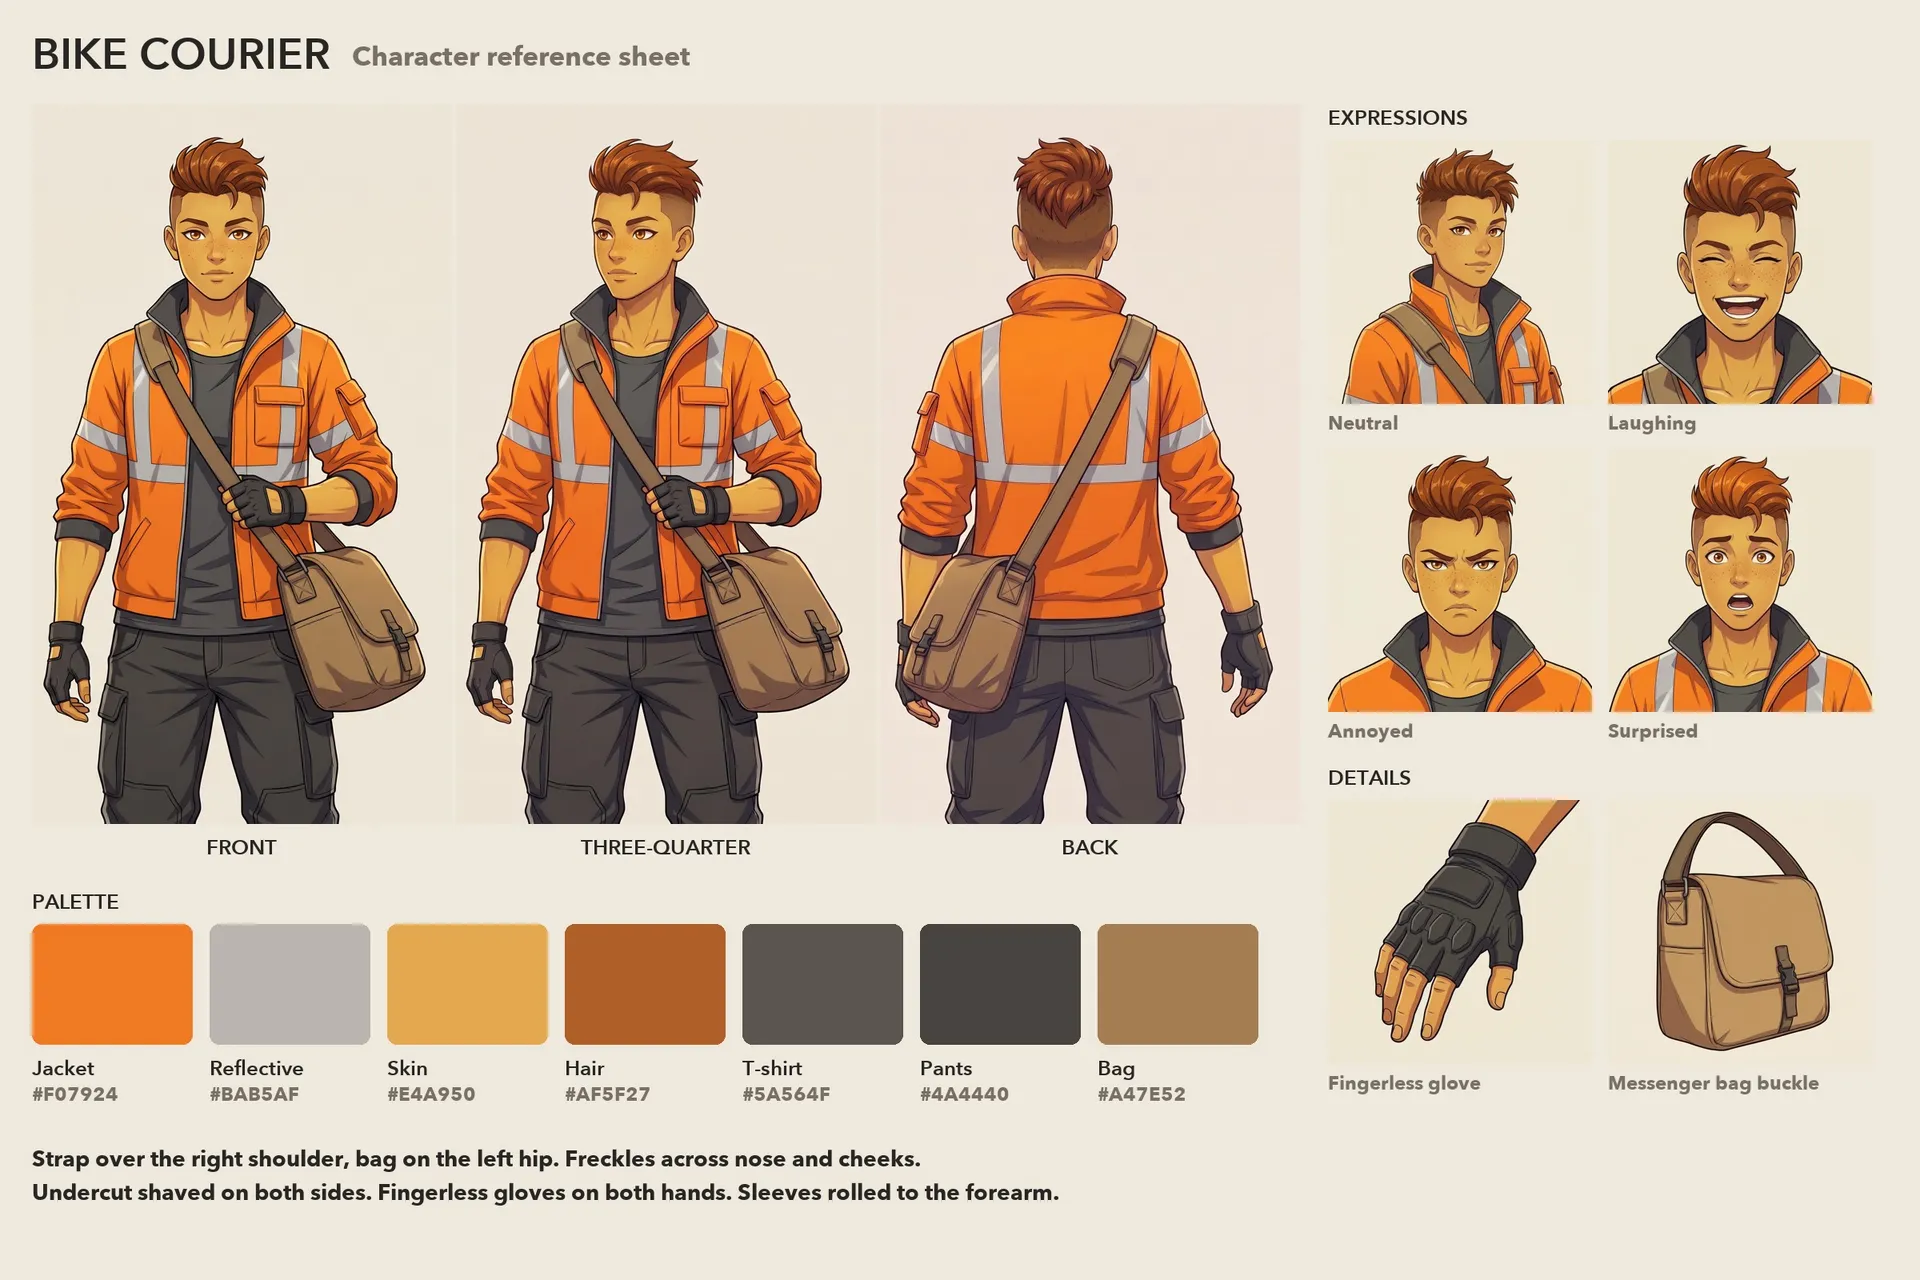
Here's the finished sheet for the courier: three turnaround views, four expressions, two detail callouts and seven palette colors with hex codes, plus two lines of notes on what must never change.
5. Check it like an animator would
Before you share the sheet, compare every view against the original image:
- Same number of stripes, pockets, buttons and accessories
- Bag, scar, tattoo or logo on the same side in every view
- Same proportions: head size, leg length, shoulder width
- Same colors under the same light
Fix any view that drifts by regenerating it or touching it up by hand. A ref sheet with one wrong detail teaches everyone the wrong detail.
Our back view failed this check. Guide lines across the head, shoulders and jacket hem lined up, but the strap ran over the wrong shoulder and the bag hung on the right hip. We fixed it in Create image with the back view and the front view as references and a prompt that named only the change: the strap on the right shoulder, the bag on the left hip, everything else the same.
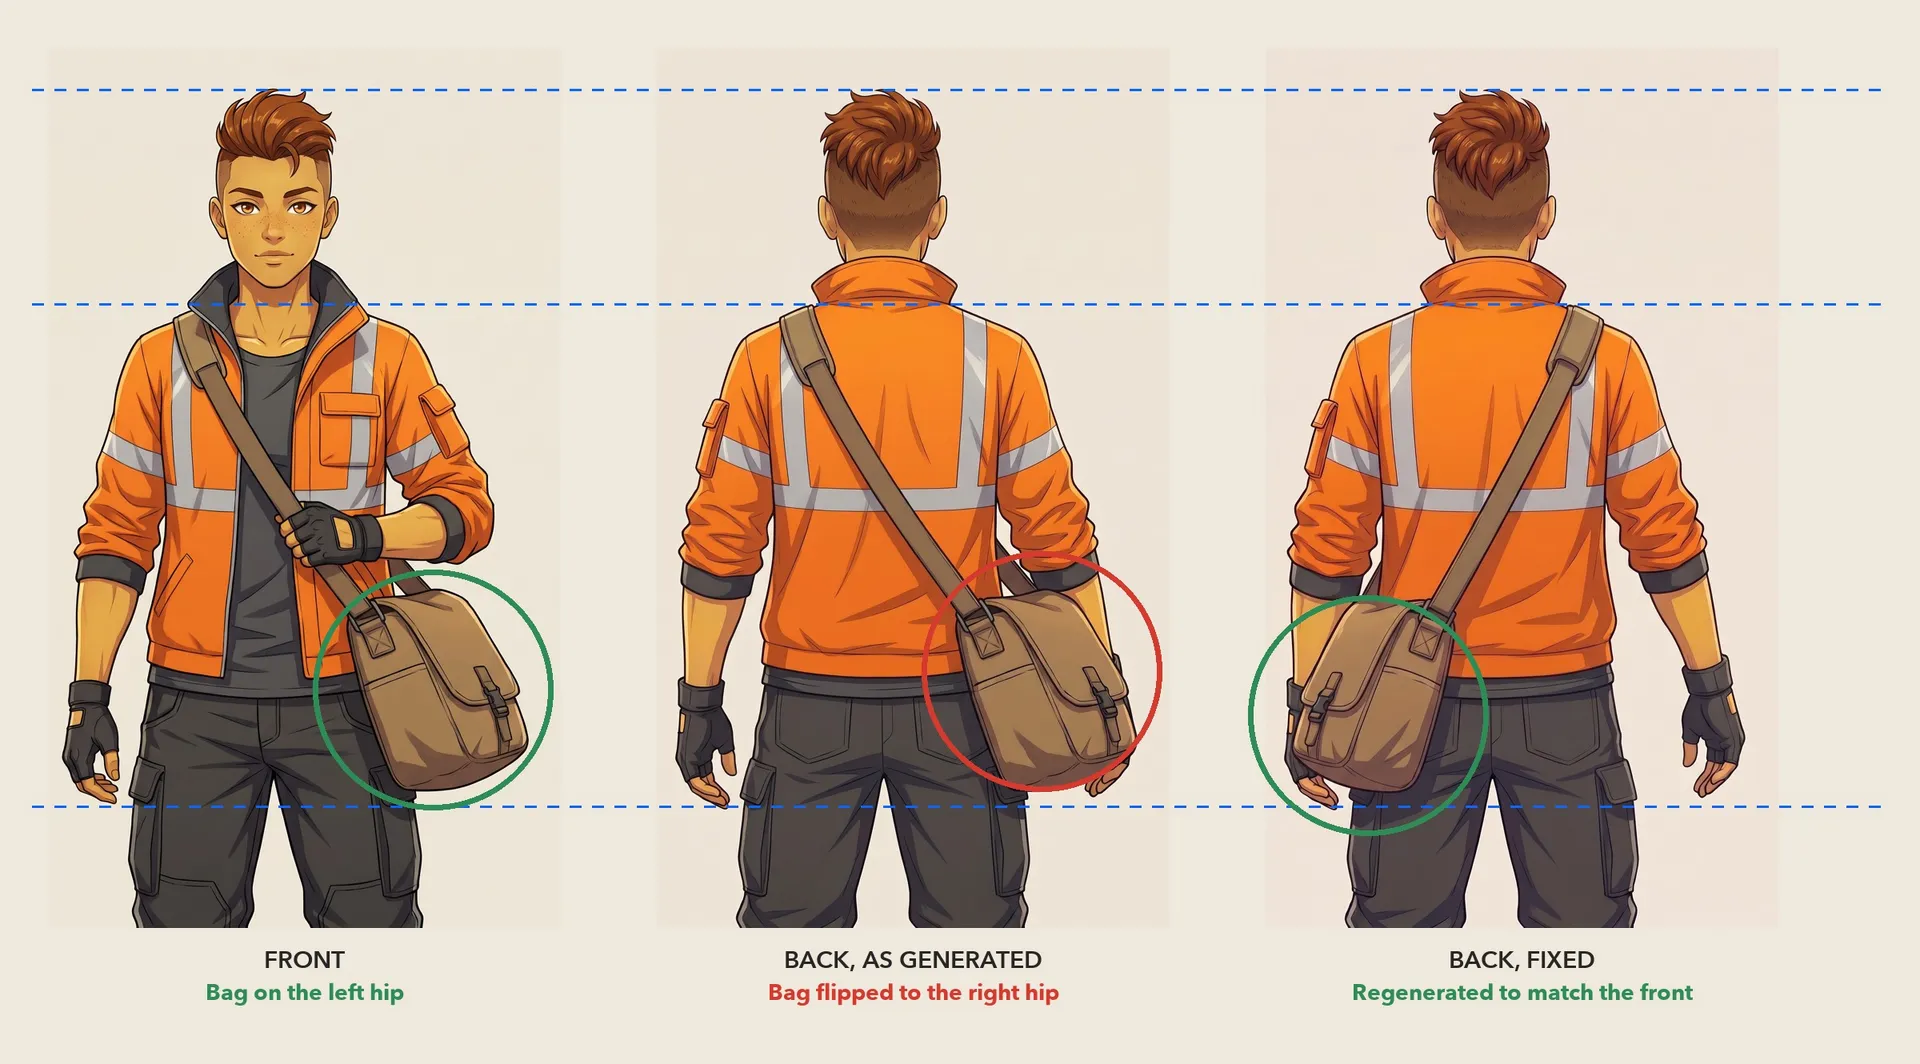
As a last check, we added the front view and the corrected sheet as references in Create video and asked for a slow 360-degree turn in place. Pause the clip at any angle and compare it with the sheet: the strap stays on the right shoulder and the bag on the left hip all the way around.
Turnaround vs. model sheet vs. character sheet
The terms overlap, and studios use them differently. A rough guide:
Term | Usually means | Typical use |
Character turnaround | Only the rotating full-body views | 3D modeling, animation |
Model sheet | Turnaround plus proportions and construction lines | Traditional and TV animation |
Character reference sheet | Turnaround plus expressions, colors and callouts | Illustration, games, commissions, brands |
Character sheet (tabletop) | A form with stats and abilities, no drawings | D&D and other role-playing games |
If someone asks for a "ref sheet", they almost always mean the full version: views, colors and details on one page.
Using a reference sheet with AI image and video tools
A reference sheet isn't only for human artists. It's also the most reliable way to keep an AI-generated character consistent across a series of images or videos.
On getimg.ai, the clean front view (or two or three views) can be saved as an Element, a reusable reference you call into any prompt with @ and its name. From there, every new scene, outfit change or campaign image starts from the same face and design instead of a fresh guess. Our guide to consistent AI characters shows how that works across images and video, and the post on how to create consistent characters with AI compares the different approaches.
Here's the courier as a playable character in a third-person game. We added the front view as a reference in Create image and asked for an in-game screenshot of the character as a 3D game model, standing on a city street with a simple HUD. Then we animated that screenshot in Create video: the camera swings around him, the way a player turns a game camera, and he runs off down the street. The face, the orange jacket with its reflective stripes, the gloves, the undercut and the single messenger bag carry over from the sheet.
A few habits make the sheet work better as an AI reference:
- Use plain, light backgrounds so the model reads the character, not the scene.
- Keep lighting flat and even; dramatic light hides colors and details.
- Include the back view if the character will ever turn away from the camera.
- Keep text and labels off the images you use as references. Put notes in a separate layer or file.
Who uses character reference sheets
The same document serves very different teams:
- Animation studios keep dozens of artists on model across episodes.
- Game developers hand turnarounds to 3D modelers and riggers.
- Comic and picture-book artists keep a character recognizable across 30 or 300 pages.
- Brand and marketing teams keep a mascot consistent across packaging, social posts and ads.
- Independent artists and OC creators share a ref sheet when they commission art of their original character.
- VTubers and streamers send it to the artists and riggers who build their avatars.
For game projects specifically, the video game character generator shows how teams explore character concepts before committing to a final design.
Common mistakes on reference sheets
Most problems come from treating the sheet like an illustration instead of a technical document.
- Action poses in the turnaround make angles impossible to compare. Use a neutral standing pose and give action poses their own section.
- A back view drawn bigger than the front leaves a modeler unable to trust either one.
- Gradients, scenery and cast shadows behind the character make edges and colors harder to read.
- The back view is the one people skip and the one others need most.
- Without swatches and hex codes, every artist picks a slightly different orange.
- Several outfits mixed on one sheet confuse everyone. Give each outfit its own turnaround.
Bottom Line
A character reference sheet keeps one character the same across every artist, model and tool that touches it. Start with a clean full-body design, build a turnaround with front, side and back views, add expressions, callouts and a palette, then check every view for drifting details. AI shortens the slow parts: design the character with Character creator, generate the views with Every angle and fill in expressions in Create image. Open Every angle and turn your character into a turnaround.
Frequently Asked Questions
A character reference sheet is one document that shows a character consistently: full-body turnaround views, key expressions, a color palette and close-ups of important details. Artists, animators, game developers and AI tools use it to draw or generate the character the same way every time.
At minimum, a front and back view of the full body and a color palette. A complete sheet adds three-quarter and side views, 4 to 8 facial expressions, callouts of details like accessories and logos, a few signature poses and short notes on what must never change.
A turnaround is only the set of rotating full-body views, usually front, three-quarter, side and back. A reference sheet includes the turnaround plus expressions, colors, callouts and notes. The turnaround is one section of the reference sheet.
Yes. Tools like Every angle on getimg.ai take one image of a character and return it from 4, 8 or 12 viewpoints. Results vary per angle, so keep the clearest front, side and back views, check that details match, and regenerate any view that drifts.
Four or five views cover most needs: front, three-quarter front, side, three-quarter back and back. Simple mascots often use only front and back. 3D modeling projects sometimes use eight views to show the in-between angles.
Use the clean front view, or two or three views, as a saved reference and start every new image from it. On getimg.ai you can save the character as an Element and call it into any prompt, so new scenes, outfits and videos start from the same design.
Images you create on getimg.ai's paid plans come with commercial usage rights, subject to our terms and applicable third-party rights. Avoid designs that copy existing copyrighted characters, since a reference sheet makes any resemblance very obvious.
Related Articles