How to Upscale Images for Professional Delivery with AI (2026 Guide)

To upscale images for professional delivery, decide the final output size and viewing distance first, then pick an AI upscaler that fits the image: a classic upscaler to sharpen faithfully, or a creative one to add detail on soft inputs. This works whether it's an AI-generated image or an existing photo, scan, or old file. In getimg.ai you open the Upscale image Action, drop in the file, pick a model, and set a target resolution (up to 16K, depending on the chosen model). Match the pixel count to the delivery spec, then verify faces, text, and edges before you hand it off.
Why Upscaling Is a Delivery Step, Not an Afterthought
Generation and delivery have different resolution needs, which is why upscaling matters. A model may output a crisp image at screen size, but a printed poster, a marketplace listing, or a large banner demands far more pixels for the same physical sharpness.
The widely used benchmark is that 300 PPI is the standard resolution for high-quality print, the point at which individual pixels disappear at close viewing. Skip the upscale and a fine screen image can look soft or blocky once it is enlarged, which is exactly the moment a client or a customer scrutinizes it most. Treating upscaling as a deliberate delivery step protects the quality you generated or created.
Match Resolution to How the Image Will Be Seen
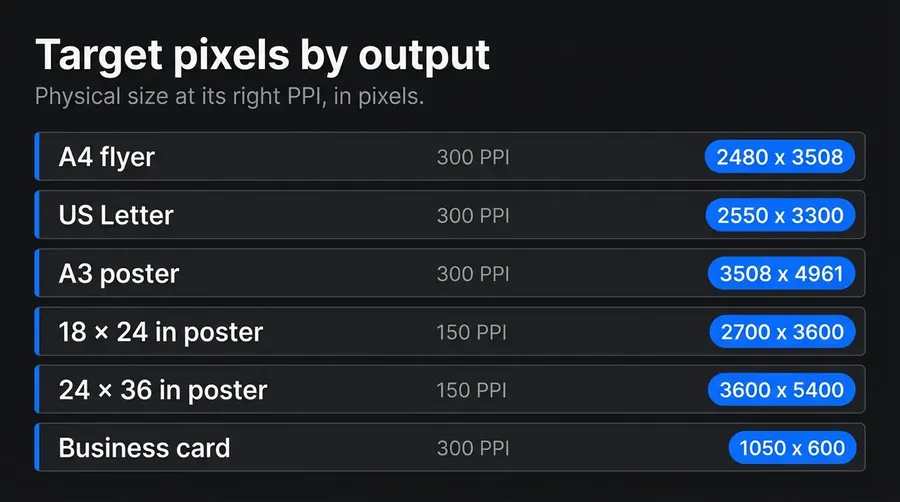
The pixels you need depend on final size and viewing distance, not on a single universal number. A business card held at arm's length wants the full 300 PPI, while a billboard read from across a street stays sharp at a fraction of that, because distance hides the difference. Work backward from the delivery spec: multiply the physical print size by the PPI the viewing distance calls for, and that is your target pixel count.
Delivery | Typical Viewing Distance | Practical Target |
Marketplace or Web Hero | On screen, close | Match the platform specification in pixels |
Flyer, Brochure, or Business Card | Close, in hand | About 300 PPI |
Poster | A few steps away | 150 to 300 PPI |
Large Banner or Billboard | Far | Well under 150 PPI |
Set the target first, then upscale to reach it. Generating a clear base image and enlarging it deliberately beats trying to force a huge render in one pass, and it gives you a predictable pixel count for each destination.
Generate Big or Upscale After?
Upscaling is not the only way to reach a high pixel count, and knowing when to skip it saves a step. Several current models generate natively at 2K (e.g., GPT Image 2) or 4K (e.g., Nano Banana 2), so for a brand-new image bound for print you can often set a high-quality output at generation time and avoid a separate pass. Upscaling earns its place in three cases: enlarging an image you already have, pushing past a model's native ceiling, or rescuing a soft or low-resolution source.
The rule of thumb is simple. If you are generating from scratch and the destination is known, generate at the highest native quality the model offers, then upscale only if the delivery size still exceeds it. If you are starting from an existing asset, a screenshot, an old file, or a favorite frame, upscaling is the tool, because there is no generation step left to set quality at.
Classic vs Creative Upscalers
The most important choice is which family of upscaler to use, because they behave differently. Classic upscalers stay faithful to the source and sharpen as they enlarge, so they preserve the image you approved. Creative upscalers add detail and texture as they scale, which rescues soft or low-quality inputs but can invent details that were never in the original. Choosing correctly is the difference between a clean enlargement and a subtly altered image.
Upscaler Family | What It Does | Best For | Watch Out For |
Classic | Faithful sharpening | Approved images, faces, text, products | Will not rescue a very soft input |
Creative | Adds detail and texture | Soft or low-resolution sources | May invent detail on faces, hands, text |
In getimg.ai, the Upscale image Action offers both families. The classic upscalers, SeedVR 2 and Topaz Standard 2, sharpen faithfully as they enlarge; the creative upscalers, Topaz Bloom 2, Topaz Wonder 3.5, and Crystal Upscaler, rebuild detail and texture on their way up.



320 x 480 px
4K - Topaz Standard 2
4K - Topaz Bloom Realism
You pick the model and the target resolution before running, so you steer the trade-off rather than accept a single fixed behavior. When identity, typography, or exact product shape matters, favor a classic upscaler; when you are reviving a soft asset for a forgiving placement, a creative upscaler earns its keep.
The Professional Delivery Workflow
A repeatable sequence keeps quality high and surprises low. Because upscaling produces a new file and leaves your source untouched, you can enlarge the same approved image differently for each destination without redoing any earlier work.
- Finalize the image first. Approve the composition, edits, and color before upscaling, so you enlarge a finished asset rather than a draft.
- Read the delivery spec. Note the final physical size and the pixel dimensions or PPI the destination requires.
- Open the Upscale image Action on getimg.ai and pick the upscaler family. Classic to stay faithful, creative to rebuild detail on a soft input.
- Set the target resolution. Pick the resolution that reaches the pixel count you calculated, up to 16K depending on the chosen model.
- Verify at full size. Zoom in on faces, hands, text, and hard edges to confirm nothing was invented or smeared.
- Export for the destination. Where a placement needs a different shape, resize the approved image rather than regenerating it.
This flow scales from a single hero image to a full catalog, and it slots directly onto the end of a product or campaign pipeline. Teams keeping products accurate in generated scenes should treat the verify step as mandatory, since a creative upscaler is where an accurate product can quietly gain a detail it should not have.
Prepare the File for the Print Shop
Delivery does not end at the right pixel count; the file has to arrive in a form its destination can use. For print, the checklist is short but easy to miss. Export a high-resolution file in a lossless or high-quality format so compression artifacts do not creep in at size.
Keep the image in RGB and let the print shop convert to CMYK on their calibrated equipment, since a blind conversion can shift color. And confirm bleed and trim with whoever is printing, so nothing important sits where the page will be cut.
For screen and marketplace delivery the checklist differs: match the platform's exact pixel dimensions rather than a PPI figure, and export in the format and file-size ceiling the destination requires. In both cases the principle is the same, hand off a file built for its specific destination rather than a generic export. Keep one high-resolution master and export a print version and a web version from it, each sized and formatted for where it is going.
The Bottom Line
Upscaling for professional delivery is a deliberate step with two decisions at its core: how many pixels the final size and viewing distance require, and whether to sharpen faithfully with a classic upscaler or rebuild detail with a creative one.
getimg.ai puts both families and the target-resolution control in one Action, up to 16K on some models, and leaves your original intact so you can deliver the same approved image at the right size for print, marketplace, and large-format placements without redoing the work.
Upscale your images on getimg.ai.
Frequently Asked Questions
Decide the final print size and the PPI the viewing distance calls for, then upscale to reach that pixel count. For close-viewed print like flyers and cards, aim for about 300 PPI; for posters and banners viewed from farther away, less is fine.
In getimg.ai, open the Upscale image Action, drop in the finished image, choose a classic upscaler to stay faithful to what you approved, and set a target resolution that reaches your pixel count. Verify faces, text, and edges at full size before sending it to print, since artifacts show up at exactly that zoom.
Classic upscalers stay faithful to the source and sharpen as they enlarge, so they preserve the image you approved, which makes them the safe choice for faces, text, and products. Creative upscalers add detail and texture as they scale, which can rescue soft or low-resolution inputs but may invent details that were never in the original.
Choose classic when identity, typography, or exact product shape must stay accurate, and creative when you are reviving a soft asset for a placement that tolerates some reinterpretation. getimg.ai offers both families, and the upscaling guide walks through choosing between them so you control the trade-off.
It depends on the final size and how far away the image will be viewed, not on a single number. Close-viewed print such as brochures and business cards wants about 300 PPI. Posters read from a few steps away hold up between 150 and 300 PPI, and large banners or billboards stay sharp well under 150 PPI because distance hides the difference.
For screen delivery, match the platform's pixel spec rather than a PPI figure. Calculate the target by multiplying the physical size by the appropriate PPI, then upscale to hit that pixel count instead of maxing every file.
If you are creating a brand-new image and know the destination, generate at the highest native quality the model offers, since several current models output 2K or 4K directly, and upscale only if the final size still exceeds that. If you are working from an existing asset like an older file or a screenshot, upscaling is the right tool, because there is no generation step left to set quality at.
The two are complementary: generate big when you can, upscale when you must, and reserve a creative upscaler for soft sources that need detail rebuilt. Either way, match the final pixel count to the delivery size rather than maxing every file.
Yes. Alongside image upscaling, getimg.ai has a separate Upscale video Action that raises footage to 1080p or 4K using Topaz Astra 2, Topaz Proteus, or Topaz Starlight. The same delivery logic carries over: match the output to where the clip will play rather than maxing every file, and the original stays intact because the upscale produces a new file. Reach for it when a rendered or archived clip needs to meet a higher spec before you hand it off.
Related Articles