Guide to ControlNet
Fine-tune image generation with ControlNet models using your images. This guide will help you achieve precise control over your AI-generated art.
What is ControlNet?
ControlNet allows you to use your own pictures as a reference for the AI when creating new images. Think of it as giving the AI a visual blueprint in addition to your written instructions (the text prompt). It doesn't replace the main Text to Image model you select in the AI Generator; instead, they work in tandem.
Different ControlNet models are specifically trained on certain aspects of images, such as edges or poses. For instance, if you want the character you generate to be in a specific position, you can choose a model focused on poses. Here's how it works.
Additional models will first extract the desired pose from your source image. ControlNet will then use this pose information to guide the Text to Image AI. This way, the AI can generate an image according to your text prompt, but it will also incorporate the selected pose thanks to ControlNet.
Types of ControlNet models
Hard Edges
Preserve all detailed edges (outer and inner) from your reference image. You could use it to maintain intricate details in complex scenes or keep specific textures and patterns intact, all while changing the image’s style.
For example, when working with a pet photo, Hard Edges will preserve not only the overall shape of the animal but also individual strands and waves of its fur.
Soft Edges
Keep only the reference image's main (mostly outer) edges, which is perfect for recoloring and stylizing. This lets you easily change an image's style while keeping its basic structure.
Soft Edges can easily turn a portrait photo into a watercolor painting, among other things. The main features of the face (eyes, mouth, etc.) and body will be preserved, but not the smaller details.
Depth
Retain the spatial relationships and sense of depth present in your source image. Maintain perspective and dimensionality while changing other aspects of the scene.
It's great for product shots—you could transform one product into another while keeping its position and size relative to other objects, such as the stand and decorative elements in the background.
Normal Map
This model focuses on surface orientations and is excellent for preserving 3D-like qualities. It’s a bit similar to the Depth model, but it’s the better choice when you need to capture your source image's convexities and concavities.
You can use Normal Map to turn a photo of a leather jacket into futuristic armor. The creases and folds of the leather will inform the contours of the armor. Or tranform a pilot teddy bear into a knight—the possibilities are endless.

Pose
Choose Pose to dictate specific character positions while maintaining their overall design. It’s meant for use with human characters; pets, fantastical creatures, and similar use cases are not recommended.
Simply put, the model analyzes your source image and turns the character into a stickman with the same limb placement. Then, when generating a new image, it ensures that the newly created character’s legs, arms, and so on are in the same position.

For the most accurate results, we recommend using source pictures that show the character at least from the waist up. Full-body images are the best option.
The Pose reference doesn’t copy characters' faces, just the position of their limbs! To keep faces consistent across different image generations, use the “Character” IP Adapter reference.
If you don’t have an image of the exact pose you’d like to copy, you can create one yourself, using tools like the Openpose AI editor. Then, download it and use it as a reference.
In that case, you can check the box next to “Skip Reference pre-processing”. This way, the model won’t try to turn your image into a stickman, since it already is one, and will go straight to the next step in the image generation process.
Scribbles
Turn sketches into complete artwork or pictures. Upload your drawings and use ControlNet to turn them into colorful images in the desired style.
With Scribbles, even amateurs can create visually compelling images from simple sketches. Watch as a simple head shape is magically transformed into a high-quality digital illustration.
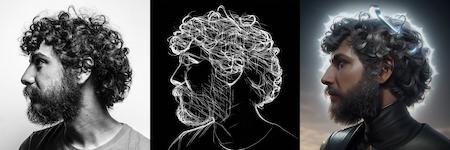
Lineart
Extract line art from the reference image. If you're an artist who loves to create lineart drawings but hates coloring them in, this is the ControlNet model for you.
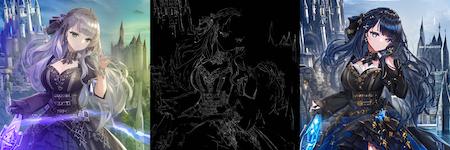
Anime Lineart
Similar to the Lineart ControlNet model, but tailored for anime-style images. It preserves the unique characteristics of anime lineart, while enabling users to color and stylize their drawings effectively.
Straight Lines (MLSD)
Generate images with a focus on maintaining the reference images' linear elements. This is a useful tool for architectural design, both exterior and interior.
For example, you could reimagine your office space in a different style, without modifying its main layout.
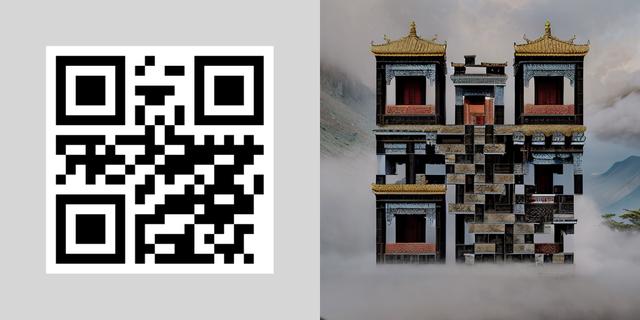
QR Code
Upload a QR code, write a prompt, and blend these elements to create unique images. This is a great tool for marketers to make QR codes more interesting and incorporate them into marketing materials in a unique way.
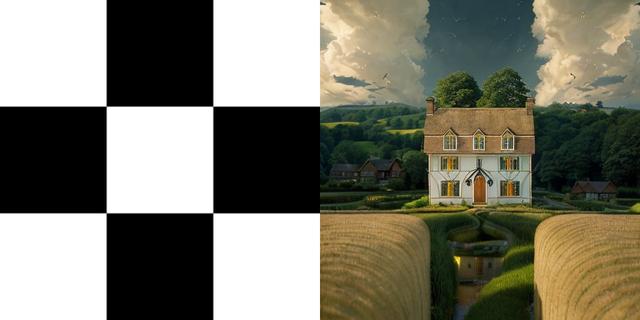
B&W Pattern
Turn ordinary into extraordinary by incorporating eye-catching patterns into your creations. Simply upload a photo of any black-and-white pattern you like, such as a swirl or zebra stripes.
The pattern will be incorporated into whatever you describe in your prompt. This way, a basic image of a house can suddenly become a unique artwork with a checkerboard twist.
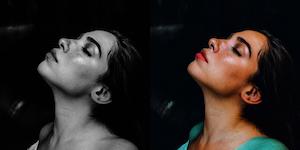
Brightness
Convert black and white images into color in seconds. Generate vibrant, colorful interpretations of your monochrome pictures (e.g., old family photographs).
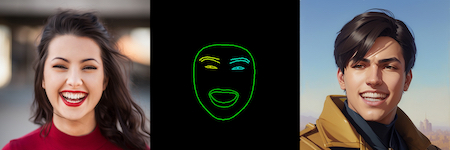
Facial Expression
Replicate any facial expression from your source image. You can literally turn a frown upside down, making your characters smile or laugh.
It's a valuable tool for DnD portraits, video game concept art, and more, allowing you to precisely control the emotions conveyed by your artwork.
Using ControlNet models
Step 1. Select a model and write a prompt
Head to the Image Generator's SD mode (remember, ControlNet models aren't available in the Essential mode: however, FLUX.1 has special FLUX Control image references, and GPT Image has GPT References) and choose a Stable Diffusion model compatible with the ControlNet you’d like to use.
Not every Stable Diffusion model works with every ControlNet model. Check out the table below to see which models are compatible with each ControlNet:
ControlNet | Stable Diffusion XL-based models | Non-SDXL based models |
Hard Edges | all models marked with an "XL" badge | all models not marked with an "XL" badge, except Freedom.Redmond |
Soft Edges | all models marked with an "XL" badge, except Stable Diffusion XL | all models not marked with an "XL" badge, except Freedom.Redmond |
Depth | all models marked with an "XL" badge | all models not marked with an "XL" badge, except Freedom.Redmond |
Normal Map | all models marked with an "XL" badge, except Stable Diffusion XL | all models not marked with an "XL" badge, except Freedom.Redmond |
Pose | all models marked with an "XL" badge, except Stable Diffusion XL | all models not marked with an "XL" badge, except Freedom.Redmond |
Scribbles, Lineart, Anime Lineart, Straight Lines (MLSD), QR Code, B&W Pattern, B&W Pattern, Brightness, Facial Expression | none | all models not marked with an "XL" badge, except Freedom.Redmond |
Then, write a prompt describing the image you want to create.
Step 2. Upload an image and choose ControlNet model
Upload an image you'd like ControlNet to use as a guideline. You can add an image from:
- your device: by dragging the file from its location into the designated area or by clicking the upload button to select a file manually,
- Image Generator: by dragging an image from the generation results or by hovering over it and clicking the “Use as image reference” icon.
Next, select the ControlNet type that best suits your goal, such as Depth or Pose, from a list in the Image Reference section.
When uploading your reference images, it is best to maintain the same aspect ratio for both the source images and the output. If the aspect ratios differ, the images may stretch, leading to suboptimal results.
You can select the “Crop image references to fit output aspect ratio” option, but be mindful that it does not always guarantee a great outcome. Images will be cropped at the center, which, depending on their composition, may lead to important parts getting removed.
Step 3. Fine-tune your ControlNet settings
Use the slider next to your source image to control reference strength, which determines how much the reference impacts the output:
- lower values cause the reference to have a smaller effect on the final result,
- higher values allow the reference to play a bigger part in the image generation process.
Be careful: setting reference strength too high can lead to abstract outcomes. In most cases, it's best to keep it below a 100.
You also have the option to “Skip reference pre-processing”. It's unchecked by default—it is best to leave it that way in most cases.
Pre-processing images means preparing them to be used as reference images. For example, if you select Hard Edges ControlNet, the source image will first be processed into a version that only retains the photo's detailed edges.
If you have an image that is already appropriately prepared (e.g., a pose skeleton for Pose ControlNet), you can check the “Skip reference pre-processing” box. Otherwise, leave it unchecked.
Step 4. Generate
Choose the number of images you want to generate (1-10) and click the "Create images" button. Experiment with different prompts, ControlNet types, and settings to achieve your desired results.
With the Multiple Image References feature, you can also combine multiple ControlNet models or use them with other reference types (Image to Image and IP Adapters) for even more control over your generated images.